
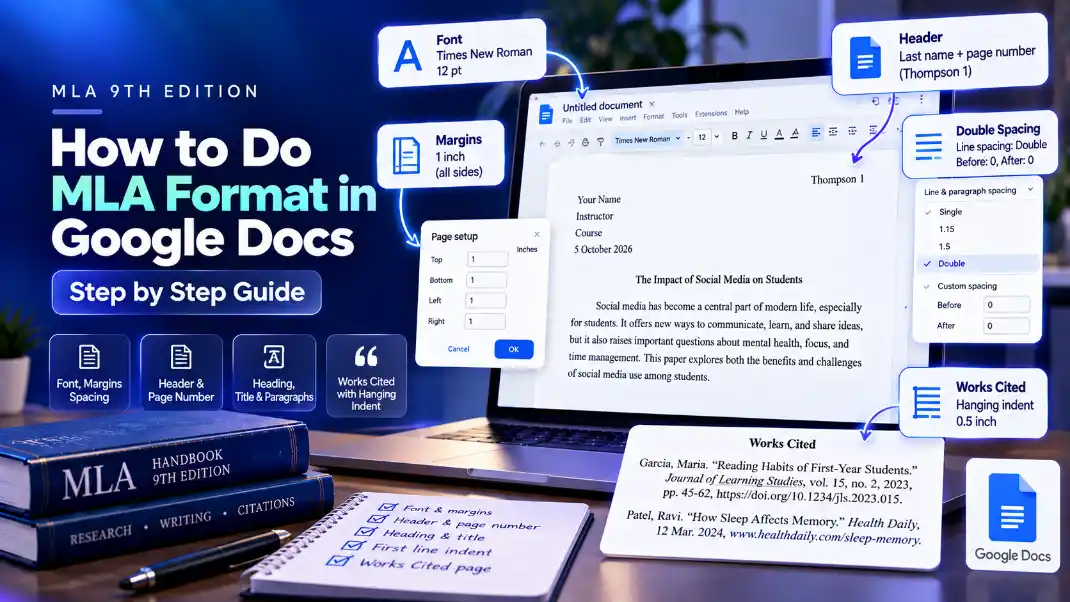
Google Docs can produce a correct MLA paper in about five minutes once you know which settings to change. You need a readable 12-point font, 1-inch margins, double spacing, a header with your last name and page number, a four-line heading, and a Works Cited page with hanging indents.
The steps below follow the MLA Handbook, 9th edition, and use the current Google Docs menus on desktop. Mac users can swap Ctrl for Cmd in every shortcut. Working in Word instead? See MLA format in Microsoft Word.
MLA Settings at a Glance
Use this table as a checklist. The steps below show how to apply each setting.
| MLA Requirement | Setting in Google Docs | Where to Find It |
|---|---|---|
| Font | Times New Roman, 12 pt | Toolbar font and size menus |
| Margins | 1 inch on all sides | File, Page setup |
| Line spacing | Double, with no extra space before or after | Format, Line & paragraph spacing |
| Header | Last name and page number, top right | Insert, Page numbers |
| Paragraph indent | First line indented 0.5 inch | Format, Align & indent, Indentation options |
| Works Cited | New page, hanging indent 0.5 inch | Insert, Break, Page break |
Step 1: Set the Font, Margins, and Double Spacing
Set these before you type, so every new line follows them.
- Choose the font. Press Ctrl + A to select everything, then pick Times New Roman and size 12 from the toolbar. MLA accepts any readable font from 11 to 13 points, so check whether your instructor prefers a specific one.
- Check the margins. Go to File, then Page setup, and set the top, bottom, left, and right margins to 1 inch. Click Set as default if you want every new document to start this way.
- Turn on double spacing. Go to Format, then Line & paragraph spacing, and select Double.
- Remove extra paragraph space. In the same menu, open Custom spacing and set Before and After to 0. Google Docs sometimes adds space between paragraphs, which MLA does not allow.
Step 2: Add Your Last Name and Page Number
The MLA running head sits in the top right corner of every page, including page one.
- Go to Insert, then Page numbers, and choose the option that places numbers at the top right of all pages.
- Click just before the number in the header, type your last name, and add one space. It should read Thompson 1.
- Go to Format, then Headers & footers, and confirm the header margin is 0.5 inch. Leave Different first page unchecked.
- Select the header text and change it to the same font and size as your essay, since headers can keep the default font.
- Click anywhere in the body to close the header.
Page numbers update automatically as your paper grows, so never type them by hand.
Step 3: Type the Heading, Title, and First Paragraph
Type the heading in the body of page one, not in the header area, so it appears only once.
- Heading: on separate lines at the left margin, type your full name, your instructor's name, the course, and the date in day month year order, such as 5 October 2025.
- Title: press Enter, then center the line with Ctrl + Shift + E. Type your title in title case with no bold, underline, italics, or larger font.
- Return to left alignment: press Enter, then Ctrl + Shift + L.
- Indent paragraphs: go to Format, Align & indent, Indentation options, choose Special indent, then First line, and set 0.5 inch. Pressing Tab at the start of each paragraph also works.
Need the heading lines formatted for you? The MLA Heading & Header Generator creates them ready to paste.
Step 4: Create the Works Cited Page
The Works Cited list starts on its own page and keeps the same running head and double spacing.
- Start a new page: place your cursor at the end of the essay and press Ctrl + Enter, or go to Insert, Break, Page break.
- Add the title: center the words Works Cited at the top, in plain text.
- Paste your entries: switch back to left alignment and add your citations.
- Apply the hanging indent: select all entries, go to Format, Align & indent, Indentation options, choose Special indent, then Hanging, and set 0.5 inch.
- Alphabetize: order entries by the first word of each, usually the author's last name. Google Docs has no built-in sort, so arrange them by hand or use a sorting add-on.
If you copy entries from another site, paste them with Ctrl + Shift + V so they take on your document's font and spacing, then reapply italics where titles need them. Build clean entries from the start with the Works Cited Generator.
Faster Options: Templates and Generators
You do not have to repeat these steps for every paper.
| Option | How It Works | Best For |
|---|---|---|
| Your own template | Format one blank document, then use File, Make a copy for each new paper | Students who write MLA papers often |
| Google Docs template gallery | Go to File, New, From template, and look for the MLA report under Education | A quick start, but check its font and spacing against this guide |
| MLA Format Generator | Enter your details and sources, then export a formatted file you can open in Google Docs | Getting the heading, citations, and Works Cited done together |
Whichever option you pick, compare the result with the settings table at the top before you submit.
Fixing Common Google Docs Problems
| Problem | Likely Cause | Fix |
|---|---|---|
| Header missing on page one | Different first page is turned on | Format, Headers & footers, uncheck Different first page |
| Header in a different font | Headers keep the default font | Select the header text and change the font and size |
| Extra gaps between paragraphs | Space after paragraph is set | Format, Line & paragraph spacing, Custom spacing, set Before and After to 0 |
| Heading repeats on every page | Heading was typed inside the header | Cut it from the header and paste it into the body of page one |
| Hanging indent not working | Only part of the entry was selected | Select every entry fully, then apply the hanging indent again |
| Works Cited starts mid-page | Pressed Enter several times instead of a page break | Delete the blank lines and insert a page break |
Ready to build your citation?
Try the free Works Cited Generator